Wednesday, April 27, 2011

Ruffled Racerback and S'mores Turnovers

Even though I've been the biggest blog slacker ever, I have not been a life slacker.
I recently started a new job! One significantly closer to my chosen career path. I'm very excited about it. :)
But with change comes the inevitable blog slacking. I apologize.

As an apology, I offer TWO posts in one!
What a deal.

First up: the Ruffled Racerback.


I got the idea for this top from another awesome blog. Her refashions are simply amazing to me.

Start with a racerback tank (Mine was 3.50 from F21), a spool of grosgrain ribbon (you only need about 7 feet), and a small amount of sewing knowledge.


Take the ribbon and sew a loose stitch straight down the middle. Break it up into three segments and leave long ends to help create the ruffle.
I made a Paint drawing to explain. Lucky you.

But don't use different colors... you get it. Moving on...


Ruffling ribbon is an incredibly satisfying act. I have no idea why.
The best way to do it is to insert a pin in one end of the ribbon and wrap the long thread tails you left around it to secure the threads. Then take the tail at the other end and slowly start pulling it and pushing the ribbon down and back towards the stationary pin. If you sewed it by hand, you'll only have one thread to pull. If you sewed it on a machine, you should have two threads, but you'll only pull one. If you try to pull both, nothing will happen, but when you pull just one, it will ruffle like magic.


Ruffle the whole ribbon as rufflely (is that a word?) as you'd like.


Starting at the back of the neck, pin the ribbon to the tank so that the center ribbon stitch is on the edge of the neckline. Fold the raw edge of the ribbon under twice to hide it. The sewing will keep it in place.


Pin it all the way around. Once you get to the back of the neck again, fold the raw edge under and pin it just like the first edge. If you overlap the two ends, it will never be noticable.
See all those long white threads hanging down? Those are my tails that grew longer and longer as I ruffled my ribbon. Leave them alone for now. Once the ribbon is sewn to the tank, we can snip all those off without worrying about unruffling.


Then sew the ribbon to the tank. Try to sew right over top of the original ruffling stitch so it will be hidden. Don't worry about the ruffles being perfect. That's not the point. Half of mine are smashed and I love the way it looks.
Now go back and snip off all those long tails and you've got yourself a pretty little tank.


Pin a ridiculously large flower (leftover from your high school colorguard days) to the tank and call it a day.

Next up: S'mores Turnovers!
I love s'mores. I love them so much this is my second, and surely not last, s'mores post.
They give me warm fuzzies inside. They always remind me of camp... (Shout out to my Lake Aurora readers!) ...but not for the reasons you'd think. The camp I went to didn't give out s'mores at campfire during the summer. But every fall there was a mother/daughter retreat and there were always s'mores at campfire during the retreats. The retreat was geared at younger children and their mothers and my mom and I went for about 12 years, so eventually we outgrew a lot of the planned activities. There are only so many times you can do a blindfolded trust walk... But every year we went to campfire and ate s'mores. You never outgrow campfires or s'mores.

I'm gonna slack off a LOT here and just redirect you to the actual recipe from Recipegirl.com, but to prove I made them, I'll add a picture.
Peanut Butter S'mores Turnovers

I made that, I promise. How great does it look? So delicious. So simple. Go make them. Right now.

Sunday, April 10, 2011

Pup Treats

When I got Watson, one of the first things my mother said to me was, "You're gonna blog about him, aren't you?" He's made appearances, but he has yet to get an entire post to himself. So here it is.

Watson's Blog Post... aka Pup Treats

I love this little guy and he loves treats, so I decided to try my hand at making my own for him. A little homemade love.
A slightly more unique ingredient list than usual: whole wheat flour, nonfat dry milk powder, an egg, vegetable oil, beef bouillion cubes, boiling water and brown sugar.

But a typically simple recipe: Put all ingredients in a bowl, mix, cut and bake.
(Okay, maybe it's not THAT simple, but almost.)

Melt the beef bouillion cubes in the boiling water, creating beef broth, and let cool. I don't have a picture of this because melting bouillion cubes look gross. You can figure it out.

In a large bowl, mix all the dry ingredients together.


Then add all the wet ingredients, including the new beef broth.

Knead the mixture until a dough forms. ...this will be messy, but fun.

THOROUGHLY clean your countertop. (This isn't actually in the recipe, but a vital step nonetheless.)
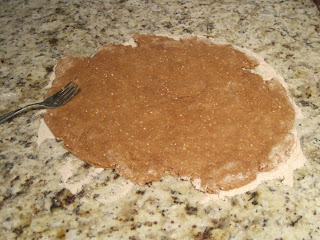
Lightly flour the countertop and roll out the dough until about 1/4" thick. This is also probably a good time to start preheating your oven to 300 degrees, if you haven't already.

Cut your dough into bite size pieces. If I were a good little Martha-wannabe, I'd have cute bone or fire hydrant shaped cookie cutters, or really any shape cookie cutters, but seeing as I clearly don't have it together as well as she does, Watson will have to live with squareish shaped treats. Somehow I think he'll survive.

Place the treats on a cookie sheet (or in a pan, if that's all you've got) and bake at 300 for 30 minutes.

Watson got very tired of waiting for the treats.

When the treats are done, let them cool and then let your favorite little guy devour.
 This is a very happy dog.


Pup Treats
2 1/2 cups whole wheat flour
3/4 cup nonfat dry milk powder
1 egg, beaten
1/2 cup vegetable oil
2 cubes of beef bouillion
3/4 cup boiling water
2 tbsp brown sugar

1. Preheat oven to 300 degrees and lightly grease a cookie sheet.
2. Dissolve the bouillion cubes in the boiling water and let cool.
3.Combine the flour, dry milk, and brown sugar. Add in the egg, vegetable oil and beef broth. Mix well.
4. On a floured surface, roll out dough to 1/4" thickness. Cut out shapes and place on cookie sheet.
5. Bake for 30 minutes and allow to cool.
6. Watch pup inhale treats. :)

Sunday, April 3, 2011

Selecting a Paint Color

Today one of my girlfriends showed me an apartment she's looking to move into. It's a charming, older building with great architecture and a lot of character. It will be perfect for her. While we were there, we were talking about what color she should paint the walls.


One of the most paralyzing decisions to be made while decorating is the wall paint color, when in fact, it should be one of the easiest. Looking at the paint chip wall at your local Home Depot can be overwhelming but remember, paint is available in practically an infinite array of colors and is the least expensive thing to change in a room. I believe that paint should not be the first decision made, but one of the last.

When it comes time to choose a paint color, find your inspiration from something you truly love. Maybe it's a bedding set already in the room and you're simply updating the walls, or maybe it's a new piece of artwork that you're completely redesigning the room around.  Whatever it is, don't let it be the paint color itself. It's much easier to find a bedding set or shower curtain that you love and then find a paint color to match than it is to find a paint color you love and then have to hunt for the rest.

For an example, let's say you found this rug and absolutely love it. (Just go with me on this one.) You want to base your entire living room around this rug. Your color choices are endless. A matching blue shade, a crisp white, a moody gray, or something completely opposite, like a sunny yellow or vibrant orange. We've now eliminated all the colors in the brown, purple, red and green spectrums. Congratulations! There goes half the paint chip wall. We've even eliminated a lot of the blues, since you'd want something close to the rug color. You wouldn't want a greenish blue or a purpley blue. Even if you wanted to go lighter or darker, you would essentially be moving up or down the paint chip, not left or right.
I'm sure that was confusing. Pictures may help?
Let's say you decided the outmost shade of blue inside the white boxy shape is the color of the rug. You'd usually only want to move in towards the center in the same line, not move left into the green shades or right into the purple shades. This seems obvious enough, but when you're overwhelmed by the options, it helps to remember this.
But now let's say you love the rug, but don't want blue walls, you want gray. Neutrals are some of the hardest colors to choose because they all have an underlying color to them. It may look harmless enough on a paint chip, but when you get it up on the wall you realize it has a tint of green or brown and clashes horribly with your beautiful blue rug.

These are just three grays I chose from my Sherwin Williams color specifier. Individually, they all look perfectly gray, but when you line them up next to each other, you can see just how different they are. The best way I've found to avoid being surprised with an unwanted shade is to gather every paint chip you can get your hands on in the color you want and start eliminating them. When you line all the grays up together, the underlying shades become more obvious and it's easier to weed out the brown grays and the green grays. Granted this won't work all the time, but it's a good starting place.


Another important decision when choosing color is the sheen. In this picture, the walls are black, a traditional painting no-no, but the high gloss finish allows light to reflect off the walls, creating a much brighter room.

Paints typically range from flat/matte, to satin/eggshell, or semi-gloss and finally to high gloss. Each paint sheen has pros and cons and suggested uses.

Flat/matte- Flat paint is essentially nonreflective and is great at hiding imperfections like dents, nailheads and patches. It's a very soft paint though and scrubbing can actually remove the paint. Many ceilings are painted in flat paint and homebuilders may paint walls with flat paint to disguise less-than-perfect finishing.

Satin/Eggshell- This is the most commonly used paint in bedrooms and hallways. It has a little shine to it and is much more durable than flat paint. It doesn't show imperfections as easily as higher gloss paints will, but it gives a nice depth to the color.

Semi-Gloss- Semi-Gloss is more durable than satin, but still not as durable as high gloss paint. It can begin to show imperfections, but its durability makes it great for higher traffic, frequently cleaned areas like bathrooms, kitchens and utility rooms.

High Gloss- This paint has a very shiny finish and hard, scrubbable surface. It's perfect for wood trims, furniture, cabinets, and any place that would need vigorous cleaning. Due to its highly reflective nature, high gloss paints show imperfections much more clearly.

Paints can absolutely be used outside of their suggested uses. I painted a small, narrow bathroom a dark, charcoal gray which completely worried my mother, but I painted it a very high gloss, and the reflective finish actually brightened the room up. I wouldn't suggest moving down in gloss, like using a flat paint in a kitchen, because durability is important. A paint finish can always be too durable, but not durable enough would be a problem.


With all the new small paint samples that retailers are offering these days, don't hesitate to grab a few samples and test out your final color options. You may spend a few more dollars on the samples, but it's worth it to not have to repaint an entire living room.