My mom got the set from her grandmother and after using it for years, it ended up in the attic. I had an adirondack chair on the balcony all last summer, but it was a little too big and clunky so it needed to go. This bistro set is much more size appropriate and with the addition of the table, it's more likely to get used.
The set is a wire-framed glass top table and two chairs. They were painted a cream color that had started to look a little drab and while the vinyl upholstery had seen better days, it kept the cushions and particle board discs underneath in excellent condition.
I put my handsome boyfriend (now fiance!) to work by disassembling the chairs. The seat and back were held onto the frame with a couple screws.
The frames almost disappear when the cushions are gone.
I enlisted the help of my brother and his powerwasher to clean the years of dirt and grime off the frames. I cleaned up anything leftover with some sandpaper to ensure a nice smooth surface. The frames got one more good spray down and then were left to dry.
After a day of drying, the frames got several new coats of glossy white paint.
The chair on the left has the new white paint while the chair on the right has the old cream paint. The difference is subtle, but it really gave new life to the frames.
To start the reupholstery process, my mom helped me take the vinyl off the particle board. The vinyl was attached with staples, so we had to pull the staples out one at a time. It took a long, long time, but we needed to save the vinyl to use as a pattern for the new fabric.
This was one of the back pieces. It had the particle board disc, the vinyl on the back side, the cushion for the front and the vinyl for the front. I reused the discs and the cushions.
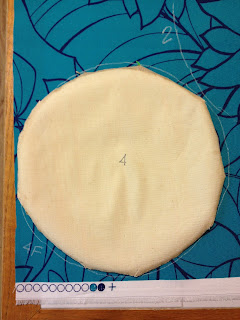
I numbered all the old vinyl pieces so I would know exactly which chair it went on and which cushion it matched in case they were slightly different sizes. I laid the vinyl "patterns" on the new outdoor fabric I chose and traced them.
You can see the faint white chalk lines from where I outlined all the pieces. I love this new fabric. It's so punchy.
For the seat cushions, I put the foam back on the seat, wrapped the fabric around the edge and stapled it in place. I stapled it in a star-like pattern, as if the seat cushion was a clock face, starting at 12, then 6, then 9, then 3, so that the fabric would be evenly tight on the seat. Then I went back and added staples until they surrounded the seat.
I went through a lot of staples...
Since the back of the chair frame is open, the same wrap-and-staple plan wouldn't work on the back cushions. I did the back side first and stapled the fabric to the rim, then flipped it over, put the cushion on and did the front side. This way the staples and uneven fabric edges would be hidden by the frame around the chair back.
Once the paint on the frames was dry and the reupholstery complete, I could put the chairs back together again.
The original feet on the chairs had dry-rotted with time, but they were made specifically for the set and I knew I wouldn't easily find replacements for them. After a few ideas were thrown around by the family, the decision was made to just get regular chair feet that can be found at any home improvement store. The frame legs of the chairs and table did fit into the standard feet and with the use of glue, they won't be easily coming out. Problem solved.
The set takes up the perfect amount of space on my small balcony and come warmer days, I can see the fiance and I enjoying a nice weekend lunch or dinner out there.

.JPG)
.JPG)
.JPG)
.JPG)
.JPG)


No comments:
Post a Comment