Meet Watson, my new dog. He's a seven year old mini beagle and he's just precious. He's not yet housebroken and is quite hyperactive, so he's taken up a lot of my time these past two weeks.
To make up for it, I have a massive THREE PART BLOG! Yay!
Part One: Book Binding
I love the look of hand-bound books. They're so rustic and beautiful. I finally decided to give it a try.
All it takes to bind your own book is paper, front and back covers, a heavy thread (I chose embroidery floss) and a needle. My covers are scrapbooking paper wrapped around cardboard. Decide how many stitches you want holding your book together. I chose 5. Open each signature up and, in the crease, punch holes through all the papers. Make sure the holes are in the exact same place in each signature or the book won't line up correctly. I created a little template that I used when punching my holes.
The top two holes in my signatures.
Now, this is kinda cheating, I know, but I'm gonna redirect you to a video. The book binding stitch I used is called the Coptic Stitch. It's hard to explain, but easy to do and easier to learn via video. There are several great coptic stitch videos on Youtube. They do a much better job explaining the process than I would.
My completed book. I kinda love it. And it's the perfect dimensions for writing lists, my favorite.
Now, onward!
Part Two: Turning a table runner into a sweet piece of wall art.
My bedroom is shamrock green, dusty pink and dark brown. At least, I wanted it to be, but I needed a little more color. When I found a great green table runner on sale at my store, I knew I needed it for something. After thinking it over, it turned into a banner above my window.
Ribbons come in so many colors and designs that it was easy to find a few that worked with my vision.
And luckily, Michaels was having a sale on ribbons. Great find.
I laid out my runner and ironed out all the creases. (My mom would be so proud of me.) Then I had to remove all the dog hair from Watson's snooping.
By strategically laying out the ribbons, I magically made the shamrocks disappear! I played around with them for a while until I found a layout I liked.
Pup was bored of craft time. (Prepare yourself for many more Watson pictures in the future.)
Once I found a layout I liked, I took a picture of it, both for blogging and for memory when I transferred it to my wall.
I attached the runner to my wall with white thumb tacks and then tacked each end of the ribbon. It took a while, but it will leave no lasting marks on the wall or on the runner. (Other than a dozen tack holes. No big deal in the grand scheme.) And now my window wall has the perfect amount of color in just the right shades.
Part Three: Valentine's Rice Krispie Treats
Oh, you wanted a difficult snack recipe? My bad.
Coming from someone who doesn't eat chocolate, good desserts are hard to come by. Rice Krispie treats have been a standby for me for a long time. So classic. But since it's almost Valentine's Day, I decided to add a little color in the form of M&Ms. (I can handle a little chocolate.)
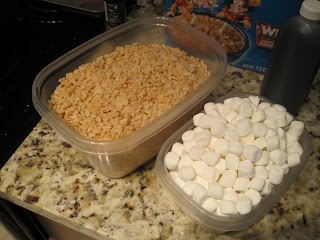
I like short ingredient lists: Rice Krispies, marshmallows, butter, vanilla flavoring and M&Ms.
6 cups of Rice Krispies and 4 cups of marshmallows. (Plus another handful to just eat.)
I melted my butter and then tossed in my marshmallows. I think melting marshmallows look so strange. (I may have tossed in a handful of french vanilla snowman-shaped marshmallows. Something's gotta counteract those M&Ms!)
Once the butter melted, I dumped in my Rice Krispies and mixed it all up. Then I threw in about a cup of Valentine's M&M's.
Once it was evenly mixed, I spread it out in a well greased 9x13 pan and let it set up. So easy and so delicious.
I never promised my crafts and recipes would always be brilliantly innovative. But who doesn't love Rice Krispie Treats? (Other than my roommate, as I just learned...)
And I will leave you with one last picture of the pup... trying to help me make the bed...
Until next time... Happy Valentine's Day!


How adorable!! I want a dog. He looks like he's being very helpful.
ReplyDeleteHe is quite possibly the least helpful animal in the world.
ReplyDelete