Sunday, December 30, 2012

Christmas Traditions

Back in 2010, shortly after moving out of my parents house, I posted the recipe for Christmas morning breakfast pizza and called it my family's only Christmas tradition. Now, two years later, as I'm back home with my family celebrating the holidays with my boyfriend for the first time, I find myself introducing him to traditions I hadn't previously realized we had.
For example, I wouldn't consider doing a Christmas puzzle a tradition, but if we do it every year without fail, I think that makes it the definition of a tradition.

All our puzzles are different and all are Christmas-themed, but they don't necessarily have all their pieces. Most of the puzzles come from garage sales or thrift stores.

I guess I should have realized how serious this puzzle tradition was when we had to take one with us to do in the hotel room over the Christmas break we spent in Canada....

The other important tradition that I hadn't realized we had involves the Christmas ornament.
Lots of families have ornament traditions, so it's not surprising that we have one as well. Our tree is covered in ornaments from our family vacations. Some families collect magnets, spoons, or shot glasses from their travels, we collect Christmas ornaments.

Some are more expected, like this Santa Claws from our trip to Cape Cod... (cheesy, I know.)
 
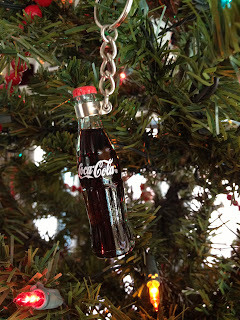
While we had to get more creative with others, like this keychain-turned-ornament from the World Of Coca-Cola from our vacation in Atlanta...
 
...or these earrings-turned-ornament from our trip to Las Vegas.

Each of these ornaments bring back memories of the family vacations of my childhood during a time of year when we should be reflecting and cherishing. It's a tradition that I want to continue as I get older.
Cameron and I got a start on our collection after our trip to the Len Foote Hike Inn. While we were there, we got a standard patch and once we got back, we turned it into an ornament by slipping it into a clear, glass ornament we found at a craft store.
It fit perfectly and will be a wonderful memory of our trip for years to come.

I hope your own holidays are full of family traditions and warm memories!

Merry (belated) Christmas and Happy New Year!

Friday, November 30, 2012

Gifting Groupons

With the holiday season approaching, Groupons and LivingSocial deals are being gobbled up for presents. They're not the impersonal, generic gift cards we're used to. Since these deals are for specific items or outings, they're just as personal, sometimes more so, as a physical gift, and kudos to you for being savvy enough to buy more for less.
 
The hard part of giving something like that is actually how to give it, how to wrap it. If it's an item that you could redeem to get your hands on and wrap, problem solved. But if it's a outing or an item that you can't redeem or something the recipient needs to redeem, that's where the problem arises.
 
I've purchased a LivingSocial deal as a present this year and it's an activity for the recipient. I can't do anything except print out the voucher as the present. But I don't want to just fold it up and put it in an envelope. That's not the least bit fun to unwrap. So I've done a little researching to find creative ways to give what is essentially a piece of paper as a present.
 
One of the online deals I see fairly often is a subscription to a magazine. It's a great gift. The Boyfriend got me a subscription to Southern Living for my birthday, which I LOVE. Instead of just telling me that he got me the subscription, he gave me the current issue with a note tucked inside.  Instant gratification. This works great for magazine, but what about other subscriptions? Maybe you got someone a year of Xbox Live. (Hey, I've seen a deal for it..) You can't really tuck it into an Xbox, but you could tuck it into a DVD case or CD jewel case.
 
Another deal I see pretty often here in Atlanta is for wine tours or bottles of wine from local wineries.
This image is an advertisement for a Vineyard Estate Wines gift card, but it's a great idea. You could slip the gift card or deal voucher into a wine glass, or empty wine bottle. If it's for a brewery tour or brewery class, slip it into a beer glass or empty beer bottle. Glasses can be a cheap but reusable addition to your gift.
 
Yet another category of deals I've seen plenty of times is photography. Sometimes it's a photo shoot, sometimes it's turning your photos into artwork. One easy way to wrap it is to frame the voucher in a frame, like Holton Studio did here.
Extra points if it matches the current decor of the recipient!
 
The last category that jumped out to me as gift-worthy is vacations. There are certainly plenty of them available on Groupon or LivingSocial. While you could find something that related to the destination, the simpliest idea I found was to request a brochure or packet from the location. Unless you're going to Disney World, having a little more information about the destination would probably be beneficial.
 
However you wrap your gift certificiates or deal vouchers, put a little extra thought into it and multiply the joy of present giving and receiving.
 
P.S. Happy 2nd birthday to my little blog.. and thanks to all the readers who have stuck with me. :)

Sunday, October 28, 2012

Patchwork Plaid Shower Curtain

In my last post, I talked about how the boyfriend had moved to his new apartment and was in dire need of just about everything. One of the things that made it on the list was a shower curtain. When I asked him what he wanted his bathroom to feel like, he said "AMERICA". I almost wish I was kidding, but let's be serious, that's a great answer.
So I looked around for some not-over-the-top patriotic shower curtains and came up with nothing until I randomly stumbled across PB Teen's Regatta shower curtain:

He instantly loved it, but asked me if I could sew it for him instead.

We played around with the proportions of the patches a little bit and came up with this plan:
A standard shower curtain is 72" by 72". We decided on 6 columns, each 12" wide made up of patches that were either 6", 12" or 18" high, varied in their placement so the columns would be 72" long.

We went to Goodwill for the fabric. I decided we should stick with standard shirts for continuity instead of adding in flannel or other heavier weight shirts. Cameron helped me choose 12 men's old plaid shirts in shades of red, white and blue in various plaid patterns. We tried to choose large or XL shirts for the most fabric, but we ended up with a few smaller shirts to get a particular pattern we liked.
 

To allow for sewing seams, I cut the 6"x12" pieces at 7"x13", the 12"x12"s at 13"x13" and the 18"x12" at 19"x13". That gave me half an inch on each edge.


I used the backs of the shirts to get the largest 19"x13" pieces and then the fronts and sleeves were cut to make the 13"x13" and 7'x13" pieces.


We spent quite a bit of time one night laying out the final pattern. We wanted to make sure the patterns and colors were spread out. While I was cutting out the shirts, I cut a few extra of each size so that we would have more options during this stage.

To sew the curtain together, I sewed the individual columns first and then sewed the columns together to create the whole curtain.
Once that was complete, I sewed the whole piece to a fabric curtain liner for both extra stability and the ease of already having the holes for the hooks at the top. It was at this stage that I hemmed the curtain.


Cameron loves the final curtain and so do I. If the shirt pieces happened to include plackets, buttons or pockets, I left them on. They add a lot of interest to the final piece and show that it was sewn from shirts. And the use of the curtain liner helps the top look more finished than buttonholes would have. Great success.

Tuesday, September 18, 2012

Adventures in Distressing

One of the things I love most about my boyfriend is his encouragement of my DIYing. He recently moved to a new apartment with almost no furniture so he's had to get some. One of the things he decided he needed was a headboard, like a real adult. After looking at tons of headboards online and in stores, we found nothing that he really liked that was in a decent price range until we came across distressed door headboards. He liked the rustic nature of them. We knew raw doors came fairly cheap from home improvement stores, but when we went to look at them, we came across something we both liked even better: Fencing. So he bought some.


He cut it down to the right size and got it ready to distress over in his mom's driveway. This project was too big for either of our apartments.


He full well knew what we had intented for the day and still wore decent clothes. Who does that?
But he was a good sport and beat up the fence like a champion. We used hammers to hit, screwdrivers to stab, and saws to...saw... We also used a baseball bat and some sort of claw thing that Cameron's mom found in her garage. I had heard that when distressing, you should always beat up the piece way more than you think you should because it's probably still not enough. So we beat and beat.


And some times he beat it up a little too well. It usually went like this:
Me: Be careful not to hit it too hard.
Cameron: Don't worry, I got this. *SNAP*
...and it happened more than once.

But it was nothing a little wood glue couldn't fix.

Once it was beat up to our liking, we sanded it for a longggg time. All our pounding and scraping left a lot of little wood shards sticking out that could be dangerous to both Cameron and his bedding so we had to smooth them out.


Then we painted it a nice shade of espresso brown.


The paint made the beatings even more pronounced and awesome. As you can see in this picture, we only messed with the top half of the fence. It didn't make sense to spend time and energy beating up the half that would be hidden behind the bed.


I really love the headboard and so does Cameron. Cheap, custom and masculine? Mission accomplished!


But I couldn't just let Cameron have all the fun.
I have a little black leather chair in my apartment that needed a side table. Because the chair is a very small size and the corner doesn't have much extra space, the table needed to be a lot smaller than anything I was finding. A weekend trip to an antique market/junk yard made me the owner of this gem:


I'm not sure what the original use of this was, but the man was selling them as light fixtures. This one was in a little pile off to the side without a light in it. A little bargining and it was my future side table.
A blank clock face from Michael's was destined to be the top.


 A lot more distressing.. and a little more of Cameron's over-zealous-ness left me with a beautifully beat up piece of wood that was cracked right down the center. Wood glue to the rescue and it was perfect again.


Staining the clock face turned out even better than I could have expected. It was perfect.


The wood disk fit right on top of the metal base, attached by a nut and bolt. It's a little tall, but not uncomfortably so. It's a great size for the corner and I really love it.

I'm going to chalk both of these experiments up as successes!

Tuesday, August 21, 2012

How to Have a Really Great Summer

I may have been slacking in my blogging, but I have not been slacking on having a great summer. Here is my apology:

How to Have a Really Great Summer

1: Find yourself the most amazing boyfriend and hold on to him.
Meet my wonderful other half, Cameron. I may be biased, but he's pretty much the best ever. He's the answer to so many of my prayers. We make a great team and I'm lucky to have found him. He keeps me busy with crazy fun adventures and romantic dates. Case in point: kayaking the Chestatee River in Dahlonega, Georgia.

So blame most of my blog-less-ness on him.

2. Go on vacation with your family while you still can.

My family spent a week in Myrtle Beach for the 4th of July and had a wonderful time. I know we won't get to go on too many more vacations together, if any, so I cherish the time we still get together. Plus we're just a fun family. People should be jealous.

3. Be a bridesmaid in a wedding of dear friends.
I love the couple that got married, Ryan and Rachel, with all my heart and there aren't two people in the whole world more perfect for each other than those two. It was a beautiful weekend of old friends and big celebrations.


4. Host an outrageous party.
Mine just happens to have coincided with the previously mentioned wedding. We had a party at the house a few days before the wedding and themed it after the groom's Scottish heritage. I have plenty of blog potential based on that elaborate planning.

I hope you all had wonderful summers as well!

Thursday, June 14, 2012

Yarn Flag

Happy 50th Blog Post!
...and Happy Flag Day!

I finished today's project about a week ago and was procrastinating posting it, when I realized today was Flag Day and it just seemed like serendipity.

50th post, 50 states. Happy coincidence? Yes.
I've posted about several different holiday decorations, but I wanted something to hang over the television for the times in between holidays. When I saw this flag, I fell in love. Yarn and America? Perfect.
The flag in that tutorial was much too large for my space and I wanted something a little less traditional. So I switched out the red yarn for brown yarn. I don't have anything red in my living room, so it would have been a little loud.

I already had all the yarn I needed in my stash. (Yay for using up the stash!) I got four 8x10 canvases on sale from Michaels. I liked how the original had three long canvases, but they didn't sell them smaller than 12x24 and that's much too large for me. Kitty helped, as ALWAYS.

Using hot glue, I glued the yarn to the top back corner of the canvas.

I wrapped and wrapped and wrapped some more until I covered the whole canvas in navy.

And a little more hot glue finished the navy piece.

To start the striped pieces, I decided to cut back to only 4 stripes per canvas: two cream and two brown. Since it's an 8" tall canvas, it easily divided into 2" stripes. I drew lines across the canvas so I knew where to switch colors.

Following the same glue, wrap, glue pattern as before, I started with cream and then switched to brown.

After finishing one, I made 3 more.

FLAG!
I struggled a little bit with how to hold it together and hang it, but this is another time it's handy having my brother around. He came up with an idea in 30 seconds.

He flipped it over and attached all the canvases together using tongue depressors and thumb tacks. The tongue depressors created a ledge I could hang from the hook on the wall.

I LOVE the way the flag turned out and I even got the seal of approval from my brother, which is saying something. Even he knows you can't hate on America. :)

Here's to 50 posts on the blog and 235 years of the most beautiful flag in the world!

Sunday, June 10, 2012

Peppers as Presents (and a Garden Update!)

Last time I posted about my garden, it was still pretty young and I wasn't sure if the plants would survive, much less thrive. Boy, did I underestimate the power of nature.

After the seedlings were large enough to move, I transplanted them into pots out on the balcony. Not yet having much faith in my own seed-to-vegetable growing skills, I hedged my bets with some additional starter plants. I added two larger tomato plants and a strawberry plant that I bought.

A week or two later and some of the plants had doubled or even tripled in size.
I was so excited about the progress. I had lost a plant or two, but the vast majority continued to grow.

Not long after that I realized that if the plants continued to thrive, I'd have to make the decision to weed them out myself, instead of letting nature do it.
The jalapenos were getting crowded fastest.

So I decided to share them with my coworkers. I found a really great idea for newspaper cups. They're economical, readily available and biodegradable. Plus it's just a cute idea.

I took a single sheet of newspaper, folded it in half and set a regular soup can on it.

I wrapped the newspaper around the can and then folded down the top edge. The newspaper is taller than the can, but we need that for the next step.

Then I turned the can over and slid the paper up so it hung out the other side and folded it down to create the bottom of the cup. I never did this part very neatly. It just needs to be completely covered so dirt doesn't fall out the bottom. I used a little piece of tape to hold the bottom together, which I'm sure negates the biodegradable part. Oops.

Flip it back over, remove the can and there's a newspaper cup. Pretty nifty little thing.

I was giving away 5 jalapeno plants, so I made 4 more cups. And kitty was very interested in what I was doing, as always.

In goes a little dirt...

... and then the jalapeno plant. I added more dirt to stabilize the plant and then watered it a little bit, which, of course, soaked the newspaper.

I ended up having to set the water-soaked cups into plastic cups, but it worked out great to transport them to the office.
I took the jalapenos to work for Cinco de Mayo. It seemed fitting. :)

About two weeks later I did it all over again with my tomato plants and bell peppers because I was running out of room on the balcony.


Now my coworkers can have salsa too!


Six weeks later and my garden is thriving! I ate my first cherry tomato yesterday. I have several more riping on the plants. There are more than a few baby jalapenos growing and the bell pepper plants are getting ready to flower. The strawberry plant continues to grow, but I haven't seen any signs of flowers or fruit yet and the same with the lime tree, although I'm not expecting fruit from it for a year at least.
I've seen more growth than I ever dreamed I could and I'm so pleased with the garden! Hopefully the salsa isn't too far in the distance. :)