Sunday, December 26, 2010

Christmas Morning Breakfast Pizza

MERRY CHRISTMAS!

Every family should have Christmas traditions. My family only has one, but it is sacred.
Christmas Morning Breakfast Pizza.
When I tell people about breakfast pizza, they usually immediately think of this:
That is NOT what I'm talking about. (Although it does look yummy...)

Breakfast pizza is the most perfect combination of crescent rolls, sausage, scambled eggs and cheese. Mmmm. So delicious. It was originally in the shape of a pizza, but we have since sacrificed the pizza shape for a larger meal. Definitely worth it.


First, brown a tube of sausage, drain and let cool. It can be whatever kind of sausage you like, but we use regular pork sausage. (Side note: it was really hard to take pictures when my brother kept trying to sneak innappropriate hand gestures into the frame... my 27 year old brother...)

Unroll one package of crescent rolls and spread it out on a pan, pressing all the seams together. Create a crust by pulling the edges up onto the sides of the pan. My mom decided this wasn't enough and opened a second package after I took this picture and evened things out a bit. My brothers couldn't taste the difference, but I could. I will never make it with just one package of rolls ever again.

Spread the sausage out evenly on the dough. (Notice the difference in the dough. Much more even and delicious-looking now.)

Try not to sneak a bite of sausage.

Crack open five eggs and scramble them up with a splash of water.

Pour the eggs over the sausage. It doesn't look so appetizing at this point, but I promise this is breakfast heaven.


Sprinkle a cup or two of cheese over the whole pan. The recipe just calls for cheese, it doesn't specify what kind. We use whatever cheese we have in the fridge. This was a combination of an Italian mixture and cheddar.

Bake in a preheated 350 degree oven for 30 minutes or until the edges of the dough start to turn a light brown and the cheese starts to bubble.

Let cool for 5 minutes and then cut with a pizza cutter and devour.
Best served with GIANT cinnamons rolls, a big glass of milk and Christmas plates. But that's just my opinion. :)

Christmas Morning Breakfast Pizza
1 tube of sausage
2 cans of crescent roll dough
5 eggs
1 or 2 cups of shredded cheese

1. Preheat oven to 350.
2. Brown the tube of sausage, drain and let cool.
3. Spread the rolls over a lightly greased 9x13 pan. Press down seams and pull up edges to form a crust.
4. Scramble the eggs with a splash of water.
5. Evenly cover the dough with the sausage, the scrambled eggs and then the shredded cheese.
6. Bake for 30 minutes or until crust starts to turn light brown.
7. Let cool for 5 minutes, cut with pizza slicer and inhale. :)

I hope your Christmas traditions are as delicious as my family's are.
Merry Christmas. :)

Saturday, December 18, 2010

Reupholstering a Rocker

When my great aunts passed away 25 years ago, their things were divided up among the family, like most things are and my family got a beautiful rocking chair.

Maybe other things too, I don't know. I love this rocker though. When I moved out last month, I took the rocker with me.

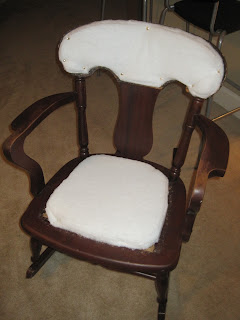
This poor rocker has hard a rough life. The tips of the legs have been dog-gnawed and it's been reupholstered several times. Most recently, it has spent the last year in storage. The fabric on it was rotting and I'm sure there was mold growing inside of it. I knew that it needed help before I could actually use it again. My mom suggested I reupholster it again, but this time take it down to its bones and start over. I'd never reupholstered anything before, but I decided to give it a shot.

Beware: this is a long post.

The first thing I did was remove all the tacks holding down the fabric. Keeping the old fabric in good shape was key because I would use it later as a template for the new fabric. I used a screwdriver to pry up the old tacks. Most of them came out easily because they're just glorified nails, but the occasional tack required more force and sometimes pliers.
After I got the tacks up I peeled away the fabric to get a good look at the cushion. I cut a piece of the cushion out to take to the store with me so I could buy a new one. I had no idea what this stuff was and what I needed. As it turned out, the not-so-helpful staff didn't know either. Luckily the store sold seat cushions made just for reupholstering. I just had to cut the cushion to the right size. More on that later though.

Once all the tacks were out, I took the cushions off and gave everything a good cleaning. (After this picture) I decided to leave the burlap and everything inside of it on the chair. Between the little I know of furniture construction and what I could feel through the burlap, it was protecting the seat supports. That was more than I knew I could handle and so I left them alone. I did spray it all down with Lysol though. No mold left on this baby.


To get the new cushion to be the right size, I laid the old cushion on top and simply traced it. Cutting it out was hard, but I used a old pair of scissors. Heavy duty scissors would be nice in this case.


I used the same method to cut out the cushion for the back, although I used batting for the back since it was much thinner than the seat cushion and I could buy it in lengths instead of seat-shaped squares. Once I made sure they were the right sizes, I attached the cushions to the chair with little nails. I tried to attach them in unobtrusive places so it wasn't obvious when the chair was done. (I did go back and take out some of the tacks holding the back cushion in place because even though I tried, I could still see them when I attached the fabric.)


I have no idea why this picture is sideways, but it's really irritating me.
I used the old fabric as a pattern for the new fabric. After laying the fabric down and moving the "patterns" around until I liked the placement, I traced them and cut them out.

A word about fabric selection- Picking out the right fabric for something like this is key. Not only the design and the colors, but the fabric itself. I plan on using this chair quite a bit so I knew I needed a heavier fabric that could withstand daily use. This paisley is actually an upholstery fabric, so it's perfect for my rocker. Upholstery fabrics are typically a little pricier than other fabrics because they're built so tough, but I knew my rocker wouldn't require a lot of yardage and I found a half yard of this paisley in the remnant stack for only $3.50. Talk about a steal.
The pattern is obviously important too though. My rocker is very dainty and feminine and I passed on several great fabrics before finding this one. It wouldn't have looked right with a geometric design or a something equally modern or masculine. Plus I just love paisley. It was meant to be.

When tacking down the new fabric, I used the same method the old one had been attached with: fold under the edges and nail down with an upholstery tack. I worked in a star pattern (much like removing a tire) to make sure that the fabric was evenly attached and taut. The number of tacks used to hold down the fabric is up to you, but I just kept adding tacks until I felt it was securely in place and the edges looked good. (I added way more than are seen in this picture. It's an in-progress picture.)

Choosing tacks is just as important as choosing a fabric. Think of it as jewelry on your chair. The store I went to had more than ten different tack options. Some were round and silver, some round and gold, some square, some shaped like little pyramids. I chose round and bronze. They matched my fabric and my vision for my chair perfectly. They look like they've been on my rocker forever.

When attaching the fabric around curves on the chair, I had to snip the fabric. This allowed the fabric a little extra give when turning corners. If you have a corner to navigate, don't fear snipping, just don't snip too much. You don't want to see that cut when you're done.


This is me showing off my lack of perfection. It's hard to tell in this picture, but the tacks come across the front of the chair and then swing out to follow the top edge across the back. My fabric didn't want to help me make that transition pretty and sometimes you just have to fudge it. If I hadn't shown it off just now, I know no one would have ever noticed that, but I know it's there. It's the beauty of doing it myself.


My beautiful, newly reupholstered rocking chair. I could not love it more. It's far from perfect, but it was my first attempt at reupholstering, and I didn't get fed up and throw it away. I call that a success. Now it's sitting beside its little table ready for a cocktail and a good book. Perhaps Pride & Prejudice?  

Friday, December 10, 2010

Marble Cheesecake Brownies

HAPPY FRIDAY!

Marble Cheesecake Brownies.
Could anything sound more delicious? NO.


My mom has been making me these brownies for as long as I can remember and when it came time for me to leave home, complete with super cute recipe box, the first recipe I added to my collection was this one. Now my recipe for you includes pictures! YAY!


Start with all the ingredients. My baking recipes always include a glass of wine... not pictured so you can't judge the giant wine glass I use. :)


Let the cream cheese soften up and then combine it with the sugar until well blended and then mix in one egg. I don't have the patience to let the cream cheese truly soften, so it's always a struggle for me to mix it all together. Mom would let her cream cheese soften, and to be honest, I can't taste any difference. She'd be disappointed to hear that. (It also helps if you have mixing bowls. We don't. Yet. They're going to the top of the shopping list.)


When it's all mixed together, it should have the consistency somewhere between yogurt and cottage cheese, depending on how well you mixed it and how soft the cream cheese was. Like I said before, it doesn't make much difference in the final taste. The yogurt consistency would be more correct, but I just can't wait for the cheese to soften.


In another mixing bowl... or plastic leftover container... combine all the ingredients for your favorite brownies. I would not suggest using any of the super fudgy brownies, or super dark brownies. The more cake-like, the better in my opinion. But if you really love dark, fudgy brownies, by all means, go for it.


Pour the brownies into an 8x8 pan and smooth out. Start dropping dollops of the cream cheese mixture into the brownies. How much or how little you use is up to you. I never use up all my cream cheese, so don't use that as a gauge. Try to spread out the dollops evenly, but again, truly, it doesn't matter.


Next comes the fun part: the marbling. Take a knife and starting from one corner zig-zag the whole way across the brownie pan. Make sure the knife goes all the way through the brownies, down to the bottom of the pan, to get the cream cheese mixture as far down as it'll go. Make it as marbley, or not-marbley as you'd like. It usually takes two or three zig-zags, in each direction, to get the cream cheese fully distributed though.


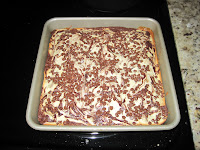
Then COVER with chocolate chips and bake! (Mom used regular-sized chips, I use mini. Use whatever you like.) Bake according to the directions on the brownie box, but when the cream cheese mixture starts to turn light brown, you know you've reached cheesecake brownie perfection.


Can't you see the perfection? :)

So, so, so delicious. Eating one as I type this. Don't judge me.


Marble Cheesecake Brownies

1 8oz. pkg of cream cheese, softened
1/3c. sugar
1 egg
1 boxed brownie mix AND ingredients required for brownies
chocolate chips to taste

1. Preheat oven to 375
2. Combine softened cream cheese and sugar until well blended then mix in one egg.
3. In another bowl, combine all ingredients for brownies and mix well.
4. Pour brownie batter into an 8x8 pan.
5. Spoon cream cheese mixture over the batter.
6. Cut through batter with knife several times for marble effect.
7. Sprinkle with chocolate chips.
8. Bake according to directions on brownie box.
9. Let cool, cut and enjoy.

Thursday, December 2, 2010

IKEA With Ease

IKEA has a bad reputation.
This is very unfortunate because it has done nothing wrong. It promotes itself as nothing more than it is: a store that sells assembly-required furniture for a fraction of the cost.
While IKEA is probably not the store for a well established home looking for longevity and quality, it is perfect for a pair of newly independent 20 year-olds needing to fill an apartment with style, much like Roommate and myself.
So off to IKEA we went.

Now, back to the bad reputation, Roommate was very hesitant to get furniture from there. She had heard that the quality was poor, the selection was limited and that it took hours, if not days, to put together the most basic of pieces. I was on a mission to prove her wrong.
We searched high and low (which, if you've ever been to an IKEA, you know I mean literally) until we finally settled on a dresser and nightstand for her bedroom, in the beautiful black-brown color. While Roommate was very pleased with the style and the price (a grand total of $250 for both) she was still hesitant about the whole assembly-required part. I promised her that I'd walk her through it and she ended up building them all by her herself.

These are my hints. :)
(In case you can't tell, I like to number things.)

1. Be honest with yourself about your handyman abilities.
While I have yet to encounter an IKEA piece that requires more than screwdrivers and hammers, you do need to know the difference between a flat head and a Phillips screwdriver. A drill is certainly nice to have on hand, but only if you're skilled. This is not a time to learn.

2. Learn the IKEA language.


All IKEA furniture pieces come with an instruction booklet and instead of words, there are drawings. Lots of drawings. It's very important to make sure you understand exactly what each picture is saying. It sounds like I'm talking to a four-year-old, but it's really frustrating when you get the piece almost entirely built before you realize you put one section in backwards and have to take it all apart again.


3. Recognize the time requirement.
IKEA furniture is assembly-required. Not some assembly-required. Most assembly-required. The time required to build the furniture will vary greatly based on the piece being built, your individual skills, whether you have a drill (I suggest a drill) and if your building-buddy is distracted every five minutes by reality tv. (Mine was.) Building a larger piece doesn't necessarily mean it will take longer. Roommate and I built a dresser and a nightstand. The dresser already had the drawer slides attached, the nightstand did not. Having the slides already attached saved us a good ten minutes.

4. Count everything first.
To your left is a picture of our living room floor covered in furniture parts and hardware. Before starting any project, count all the included parts, not only to make sure there are enough, but to recognize where they're used in the instruction manual and to make sure nothing was dinged or scratched in the packaging. Possibly worse than realizing you'd put a part on backwards would be realizing, once it was completely built, that there was a gash on the top of your beautiful new dresser. Luckily that's never happened to me. Knock on wood ...and fiberboard. :)

5. Be patient and exact.
Patience is a virtue and a good one to have while building furniture. Thanks to pre-cut holes and slots, it's easy to assemble IKEA's furniture, but only if you screw screws in straight and slide slots in perfectly. If they're off by a degree, it won't fit together the way it's supposed. So go slowly and make sure that things are going in squarely. Hurrying won't buy you anything if you have take out the screws because the next piece won't fit squarely.

6. Be proud of what you've accomplished!
Building your own furniture is something to be proud of accomplishing, even if it comes with picture directions. The satisfaction of admiring a piece and knowing that you put it together is a wonderful feeling. Once we finished building the dresser, Roommate stood back and declared, "Look at me, I'm a handyman!"
While I don't suggest she go build a dresser from scratch, she had every right to be proud of building her furniture. Now it not only holds her clothes, but some blood, sweat, and tears as well. (Possibly an exaggeration, but there were certainly more than a few curse words uttered in the process.)


Roommate's beautiful IKEA Hemnes dresser


I hope I've encouraged at least one of you to take a peek at IKEA next time you need a new piece of furniture (or artwork or lighting or bedding.. they have EVERYTHING!)

Until next time...
XOXO-
Not Martha
(Roommate and I might have had a Gossip Girl marathon today...)

Wednesday, November 24, 2010

Holiday Decorating on a Dime

Happy Thanksgiving!

I've been super busy recently! Between moving out on my own for the first time (Yay!!) and visiting family for Thanksgiving, time is just flying by!

In the midst of making pies and stuffing, I wanted to take a break and share my thought on Holiday decorating.
I'm very pro decorating for the holidays. They've proven that people get more excited during the anticipation of an event than during the actual event and that definitely applies to me. I love love love Christmas and New Years, but I get more excited about decorating and baking and wrapping and all the extras that go with the holidays than the holidays themselves. (Don't tell my minister...)

The downside is that decorating for the holidays isn't cheap and frequently being thrifty, quite frankly, looks thrifty.
So here I am with suggestions for decorating without breaking the bank!
(My apologies to readers of other faiths. I celebrate Christmas and don't want to try to pretend I know how to decorate for other December holidays.)

1. Real greenery.
Having real greenery in the house is my favorite way to instantly get ready for the holidays. Not only is the act of going and picking out a Christmas tree or a wreath so classic and festive, but the smell of real greenery removes the need for winter scented candles.
Real trees and wreaths are obviously something you'd need to purchase every year, but the cost of a real tree can range from half to a quarter of the price of an artificial tree.


2. Vases and Flowers
My favorite, favorite, favorite secret for vases is dollar stores.
This vase to my left is a very classic cylinder vase found in many stores across the country. Target sells this vase for $14.99. Dollar stores sell it for, you guessed it, a dollar. While it's not gonna be the same quality as a more expensive vase, if you're trying to decorate on a budget, it won't make a bit of difference.
Another great steal from dollar stores are vase fillers: stones, rocks, that kinda thing. I love to fill the bottoms of vases with fillers to hold up my flowers. Dollar stores sells bags of fillers for, again, a dollar, while Target and Michaels and similiar stores can sell them for $9.99.
On the same token, dollar stores are my worst nightmare when it comes to flowers. You will NEVER find me buying flowers from dollar stores. Those are one thing I will splurge on.

3. Glassware
I think one of the best parts of a holiday gathering is the cocktails and they deserve glassware worthy of themselves. Personally, I have a nice collection of wine and martini glasses... which are used frequently :) ... but I can understand that many people don't. Buying a set of plastic cocktail cups for a party just screams tacky to me. I'd rather drink out of a red Solo cup than a plastic martini glass where the base detaches from the top.
Dollar stores (again I loveee them) sell glasses! Rejoice! And good looking ones too! Target, my other go-to store, sells a set of funky, zig-zag stem martini glasses for $15.99. Dollar stores (specifically Dollar Trees) sell amazingly similar ones for $1 each. Can you tell which are which? (I'll give you a hint: Target's come in a set of 4.)

If you were to buy a glass for each guest at your soiree, you still probably wouldn't spend much more than Target charges for a set of 4. (Unless you're throwing a large holiday party and then red Solo cups might be a good idea.)

4. Wrapping Paper
So frequently we spend so much time and effort picking out presents and then wrap them pretty generically. After the age of ten, I think everyone is over flying Santas and dancing reindeer on Christmas morning.

My suggestion is to get a solid color of wrapping paper in a classic holiday color, red, green, gold, or my favorite, cream. Solid papers are often much cheaper than decorative papers and can be much more elegant. Wrap the package up in the solid color and then use ribbons and bows to make each box unique. Red and lime green ribbon would be perfect for a child, Crimson and gold for your grandparents and blue and silver for your Jewish roommate. (Doesn't everyone have one, or is that just me?) Much easier, and cheaper, than buying three different rolls of paper and your loved one will be able to tell you thought about the outside just as much as what's inside.


I hope these tips help you decorate for the holidays a little cheaper this year.

Once again: HAPPY THANKSGIVING!


Sunday, November 14, 2010

Welcome! Bienvenue! Welkom!

Welcome to my brand spanking new blog!
I'm really excited about where I'm planning to go with it and I hope you are too! :)

Here's the rundown.
As I mention in my About Me section over there, I do all sorts of crafty things... many times to the frustration of friends and family.. and I hope to inspire you to do creative things too! I am a firm believer that anyone can be creative, no matter how much they might think otherwise. They just need a little direction.

So here I am: COMPASS OF CRAFT!

 Tattoos are Crafts too!


Since I'm super new at this, many of the blog-related things, we're gonna learn together. Yay! But I will be posting blogs relating to something crafty or culinary (don't get too excited yet, but I make a MEAN cheesecake) at least once a week.
If you're looking for the cleaning/organizing kind of Martha, LOOK ELSEWHERE. That is NOT me. :)

I hope you're getting excited. I know I am!
If you ever have any questions or suggestions or just wanna say hi, leave me a comment! :)