Anyone who knows me knows how much I love Harry Potter and how excited I am to go to the Wizarding World of Harry Potter this weekend. (So very excited.)
So I thought it would be appropriate to do a Harry Potter themed snack or craft this week. But after much research, I couldn't find anything that struck my fancy. I really wasn't keen on making a wand.
However, I did stumble across this beauty.
It's a 16x20 cross stitched Hogwarts crest. I love the Latin motto. It translates as "Let Sleeping Dragons Lie". So perfect for Harry Potter. The pattern can be found here if any of you feel up to making one. I'm kinda in love with it and definitely want to make one. Not sure where it will go, but let's not worry about the details. One thing I SHOULD worry about: I don't know how to cross stitch. Yet. But have no fear, I got myself a pretty little pattern (MUCH simpler than this one) and some thread and I'm learning. Baby steps.
So instead of a dramatic Harry Potter craft, I have painted vases. Still very cool.
My mom and I came up with this idea (as if no one else has EVER had this idea..) back when I was redoing my bathroom and we couldn't find the right vase for some flowers. I loved it then, I love it now.
Start with glass vases and acrylic paint. It could be any kind of glass vase, but I got mine from the dollar store. We're on a budget here. I did splurge on metallic paint though. It's about a dollar more, but totally worth the finished product.
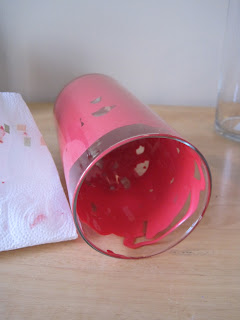
Squirt the paint all over the INSIDE of the vase. Don't cover the outside. That ruins the effect. Inside only. (Can't you see the glimmer of the metallic red?? So much better than regular red. Regular is boring.)
Start out with less paint than you think you need because only a thin coat needs to cover the sides. Rolling the vase or shaking it around will help spread it out. You can always add more as you go, but if you use too much, it will never dry.
Once you have the entire bottom and most of the sides of the vase covered in paint, turn it upside down on a paper towel or plate or anything you don't mind getting paint all over. This will help the paint seep down the sides, filling in all the extra holes, will get the top rim covered and will prevent an inch thick pile of extra paint trying to dry in the bottom of the vase.
Then let them dry! This is truly only key if you plan to put something in them. This time I'm not adding anything, so it doesn't matter how long they dry because the paint is inside and won't get on the shelves. Because the paint is on the back side of the glass, it gives the vases a laquered appearance. They're shiny in a way that painting the outside will never get you.
Then display them. ...as the only decoration in your new Ikea bookcases... yayyy.
My mom and I did this back in October for a Halloween party, only we didn't cover the entire vase, we just let the paint drip down the edges and then put a candle inside each one, giving it a really creepy look.
We set them next to a very Dark Mark-esque skull.
Apparently I let Harry Potter infiltrate my life more than I thought because I also just remembered that I made this a while back:
I bought this beautiful frame and was struggling with what to put in it and decided that one of my very favorite quotes from Albus Dumbledore was perfect. I guess that kinda counts as a Harry Potterish craft... minus directions on how to make it. Nevermind.
Anyway, as you can tell, I'm pretty pumped. Maybe I'll try out a Butterbeer recipe when I get back.


No comments:
Post a Comment